Wednesday, February 24, 2016

Indian Curry Two Ways

America's Test Chicken consists of two separate chickens, each with her own take on this cooking thing. Check out Chicken One's related blog, A Travel for Taste where she shares travel stories and recipes collected whenever she ventures abroad. And give Chicken Two's new, also-related blog, Poop from the Coop a read. There you can find stories about her personal adventure re-experiencing the kitchen after many years away. Please join our Facebook group to share your own recipes, kitchen practices and know-how. We are also on Pinterest and Instagram.
The complete recipes appear at the end of this post.


From Chicken One:
This time around the Chickens wanted to make a basic Indian curry dish. In Indian Cooking Unfolded, one of our new favorite cookbooks, author Raghavan Iyer lays out a simple recipe with delicious results.

True to course, we each chose a variation. I did the straightforward chicken curry described in the book. Iyer gives several substitutions, though, including pork, tofu and even potatoes.

It's nothing more than sauteeing some onions, garlic and ginger in oil...
...adding spices, diced tomatoes and cream, then processing until smooth...
...then adding cubed meat or other protein and cooking til tender.

We served ours over basmati rice with naan flatbread on the side. It's that easy!
It makes great leftovers, too. I like to double this recipe so I actually have leftovers!

Then we had to make a trip to Patel Brothers just in case there was something there we needed to see!

Try the recipe below and let us know what you think!

From Chicken Two:

This was a fun dish to make! It's a very easy recipe that makes a basic dish you can use in a variety of ways. I made it with Pork and, though I know you've heard this before, it tasted just like chicken! Ha ha! No, really....the key is in the spices used...and that's pretty much the basis of the flavor.

If using the Pork, I recommend cooking it a little longer than the recipe states to get it more tender.You can also use Tofu, lamb, potatoes or any other ingredient and still have a delicious dish.


Both Chicken #1 and I highly recommend doubling the spices in the recipe. We're not sure, but we think perhaps the author thinks we Americans can't handle a little fire!

Speaking of spices, the recipe called for a spice blend called Raghavan's blend. (Concocted by the author of the book and used in the place of Madras Curry blend.)

I made it myself prior to our cooking fest and when I smelled the finished product, I think it cleared my sinuses!


You can find the recipe for the blend on Poop from the Coop where I detail the process.


Indian Chicken or Pork Curry

Ingredients
  • 2 tablespoons canola oil
  • 1 small onion, coarsely chopped
  • 4 medium cloves garlic, coarsely chopped
  • 4 pieces fresh ginger (each about quarter-coin size), unpeeled and coarsely chopped
  • 2 teaspoons spice blend/Madras curry powder or to taste
  • 1/2 cup canned diced tomatoes with juice
  • 1/2 cup half-and-half
  • 1 1/2 pounds chicken or pork cut in 2-inch cubes
  • 1 teaspoon kosher or coarse sea salt
  • 2 tablespoons finely chopped fresh cilantro
Cooking Directions
  1. Heat oil in skillet over medium-high til it shimmers. Add onion, garlic and ginger. Saute til onion starts to turn brown, 4-5 minutes.
  2. Sprinkle spices into skillet. Stir and let roast about 10 seconds. Add tomatoes and stir.
  3. Lower heat and simmer, uncovered, stirring occasionally, 5-7 minutes.
  4. Add half-and-half and scrape bottom of skillet to deglaze.
  5. Transfer sauce to blender or food processor. Puree until it looks slightly curdled but smooth.
  6. Return to skillet, stir in meat and salt.
  7. Simmer over medium-low, covered, stirring occasionally, until meat is tender and cooked through, about 12-15 minutes for chicken, a little less for pork.
  8. Serve warm over rice and garnish with cilantro.

 Print Friendly and PDF

Tuesday, February 16, 2016

Poppadums - Wispy Thin Indian Crackers plus Dips

America's Test Chicken consists of two separate chickens, each with her own take on this cooking thing. Check out Chicken One's related blog, A Travel for Taste where she shares travel stories and recipes collected whenever she ventures abroad. And give Chicken Two's new, also-related blog, Poop from the Coop a read. There you can find stories about her personal adventure re-experiencing the kitchen after many years away. Please join our Facebook group to share your own recipes, kitchen practices and know-how. We are also on Pinterest and Instagram.


From Chicken One:
Despite the recipe at the end for the luscious avocado dip, the star of this post isn't the dip, it's the crackers! These typical Indian thin wafers are called poppadums, papadums, papads, or about a thousand other spelling variations.

The reason for this is that the word comes from the Tamil language spoken by about 52 million people in southern India and Sri Lanka. Because Tamil has a different alphabet than English, the translated spellings are all over the board.

The Indian restaurant my husband and I frequented in Germany served poppadums with three types of dipping sauces as an appetizer. Think chips and salsa at a Mexican place. We loved them!

Suffice it to say that these crackers are light, crispy and really fun to toast. They are made of urad flour, which is ground from a type of lentil, which also means they are gluten-free.

Initially, the Chickens had decided to make poppadums from scratch, but we were unable to find the right kind of flour. That turned out to our advantage, but I still reserve the right to do so in the future.

We made yet another pilgrimage to our favorite Indian market. There were about 20 types of poppadums on the shelf. Not knowing what we were looking for or at, we chose two types at random.
Chicken Two toasted our papads and made an avocado "dip" from one of our favorite cookbooks, Indian Cooking Unfolded by Raghavan Iyer. The dip was amazingly close to guacamole. I made a topping from the same book called chile-spiked onion, which was freakishly similar to pico de gallo. We determined that, at least in this case, Indian food was Mexican food with Indian spices, or vice versa. In fact, cumin and cilantro feature heavily in both culinary traditions.

I'm not posting the chile-spiked onion recipe here, but I have a killer pico recipe on my other blog, A Travel for Taste. Click this link for the recipe.
The third dip in the picture below is a raita, an Indian yogurt sauce that can be flavored in many ways. This particular one had mint and cilantro. It wasn't spectacular, but I look forward to trying more combinations in the future!

From Chicken Two:

This was really great fun to do, took very little time and the results were quite tasty. 
I think the hardest part was gathering the ingredients! 

I ran all over town to various stores looking for urad, or black lentil, flour because the recipe I found for poppadums called for using one or the other. (Actually, I found out later you can use other flours like chick-pea.) Of course these flours were not to be found in any of the usual food stores and I was a little panicky about being able to make these, thinking we were doing it from scratch. Thankfully, we decided to use the prepared ones, which we found at our favorite Indian market!

Now the really fun part was watching them bubble up.  Place them as close to the broiler elements as possible for just a few seconds. (If your stove runs really hot, back off a little; use a lower rack.) Watch carefully! And I do mean WATCH!


Here's what happened when I took my eyes off them for a second! (I swear, just a second!!!)


And here's what they are supposed to look like.

The result was light and crispy and wonderful to use with the dips mentioned by Chicken One. Check out the recipe below!


Avocado Pomegranate Dip for Poppadums

Ingredients
  • 2 teaspoons coriander seeds
  • 1 teaspoon cumin seeds
  • 1/4 cup firmly packed fresh cilantro leaves and tender stems
  • 2 tablespoons freshly squeezed lime or lemon juice
  • 1 teaspoon coarse kosher or sea salt
  • 1 small onion, coarsely chopped
  • 3 large garlic cloves
  • 2 - 3 fresh green serrano chiles, stems discarded
  • 3 large ripe Hass avocados
  • 1/2 cup fresh pomegranate seeds
Cooking Directions
  1. Toast the coriander and cumin seeds in a dry skillet over medium-high heat, shaking every few seconds for about a minute until they turn reddish brown and smell nutty and citrusy. Place on small plate to cool. When cool, grind to a powder in a spice grinder.
  1. Place cilantro, lime or lemon juice, salt, onion, garlic and chiles in a food processor. Pulse to mince; don't let it run continuously or there will be too much liquid.
  1. Pit, peel and cube the avocados into 1/4-inch pieces. Place in medium bowl and fold in the cilantro and spice blend and pomegranate seeds.
  1. Serve immediately or seal tightly and refrigerate for up to 2 days.

 Print Friendly and PDF

Sunday, January 31, 2016

Indian Spiced Potatoes, Cauliflower and Peas (Aloo Gobi), Two Ways

America's Test Chicken consists of two separate chickens, each with her own take on this cooking thing. Check out Chicken One's related blog, A Travel for Taste where she shares travel stories and recipes collected whenever she ventures abroad. And give Chicken Two's new, also-related blog, Poop from the Coop a read. There you can find stories about her personal adventure re-experiencing the kitchen after many years away. Please join our Facebook group to share your own recipes, kitchen practices and know-how. We are also on Pinterest and Instagram.
 The complete recipe appears at the end of this post.


From Chicken One:
The recipe we used for this post mentions it's Punjabi, a state in India bordering Pakistan. In my research for this post, I discovered that it's called Aloo Gobi, with Aloo meaning "potatoes" and Gobi meaning "cauliflower". I also discovered that it's a staple of Indian restaurant menus all over the world. It's also considered a Pakistani dish.

I caution you to use boiling potatoes - red, yellow or gold - not baking potatoes like russets. Boiling potatoes will stand up to, well, boiling, and not go to mush in this dish. You can see the beautiful, giant red potato I used below:
That said, if you cook any potato too long it will become squishy, as will cauliflower. So don't overcook them.

As with any common, traditional recipe, each home cook has his or her own spin. With Indian food, it's the spice combination that gets the creative twist. Therefore, many different spice combos are possible here, including using coconut shavings, curry leaves, black mustard seeds, etc. All of the mixes seem to use turmeric, however, which gives a characteristic yellow color.

Since we're just beginning our foray into the spices, we stuck to the recipe in the book. But I already have some ideas in the back of my mind for the next time I make this. For one thing, I'd kick up the heat a little.

It's pretty straightforward:
Partially cook the potatoes and set aside. Then process the aromatics together...
and set aside. Whisk tomato paste, water, lemon juice and a little sugar. Set aside. I'd also recommend combining the spices in a bowl together and set them aside as well.

Once you have all these things set aside, it's an easy cook up: saute the aromatics, add the spices, add the cauliflower, potatoes and peas. Cook a few minutes and serve.

From Chicken Two:
I'm really excited to be cooking recipes from this region of the world. Besides experimenting with some great tasting dishes, we're learning about the region, customs, spices and history. It's a great way to travel if you can't actually get there any time soon!

When we decided to cook Indian food, we went out and bought a few cookbooks that we hoped would be authentic. Wouldn't you know, this recipe came from a book we already had in our collection - Williams Sonoma, Asian Cooking. When we asked an employee of our favorite Indian market about cookbooks, she referred us to the internet! Ha ha! Isn't that the way it is these days! Plenty of recipes there!

The recipe below was wonderful, with all the spices and texture. I substituted parsnips for potatoes. 
I guess it wouldn't be called Aloo Gobi but when I tried to translate parsnips into Punjabi, it still read parsnips. So….I made Parsnips Gobi, I guess! The parsnips kept their shape and didn't turn mushy. Frankly, there wasn't much difference in the taste between this and the potato version. Spices rule! This dish can be used as a starter, a side,or, as we did, a main dish served over rice.
You can store in the fridge for 3-4 days but don't freeze because it can get pretty mushy.

Hint: Chicken One used a  pot with high sides, like a stock pot and I used a wider style like a large frying pan. When partially covered, my liquid evaporated faster and the spices became more concentrated. (This doesn't give you a lot of liquid to put over the rice, if that's important to you.)


Indian Spiced Potatoes, Cauliflower and Peas (Aloo Gobi)
Ingredients
  • 4 1/2 teaspoons salt, divided into 1 tablespoon and 1 1/2 teaspoons
  • 1 large (about 1/2 lb/250g) boiling potato
  • 1 small head (about 1 1/4 lb/625g) cauliflower
  • 1 small yellow onion, chopped
  • 1 2-inch (5cm) piece fresh ginger, peeled & chopped
  • 3 cloves garlic
  • 1 serrano chile, seeded and chopped
  • 1 tablespoon tomato paste
  • 1 teaspoon fresh lemon juice
  • 1/2 teaspoon sugar
  • 1 cup water
  • 1/4 cup (2oz/60g) ghee or canola oil
  • 1 1/2 teaspoons ground cumin
  • 1 teaspoon ground coriander
  • 1 teaspoon ground turmeric
  • 1/4 teaspoon ground cinnamon
  • 1/8 teaspoon cayenne pepper
  • 1 cup (5oz/155g) English peas or thawed frozen peas
  • 1 tablespoon minced fresh cilantro
 
Bring a large saucepan ¾ full of water to a boil and stir in 1 tablespoon salt. While it heats, peel potato and cut into 1-inch (2.54 cm) cubes. Trim and core cauliflower and separate into 1-inch (2.54 cm) florets. Add potato cubes to boiling water. Cook until partly tender but not done, 6-7 minutes. Drain into colander; rinse with cold water to stop cooking. Set aside. In food processor or mortar, combine onion, ginger, garlic and chile. Grind to a smooth paste. Set aside. Whisk together tomato paste, lemon juice, sugar and 1 cup (8oz/250ml) water. Set aside. In Dutch oven or large frying pan over medium-high heat, warm the ghee/oil. Add onion paste; sauté til it just begins to turn brown, 4-5 minutes. Add cumin, coriander, turmeric, cinnamon, cayenne and 1 ½ teaspoons salt. Stir to mix. Add cauliflower and sauté til coated, about 2 minutes. Reduce heat to medium-low. Stir in tomato paste mixture, potato cubes and peas. Cover and simmer, stirring occasionally, until the vegetables are tender and liquid has evaporated, about 10 minutes. Stir gently so veggies don’t fall apart. Transfer to a warm bowl, garnish with cilantro and serve at once.
Print Friendly and PDF

Tuesday, December 22, 2015

Egg Nog, Two Ways: Traditional and Puerto Rican

America's Test Chicken consists of two separate chickens, each with her own take on this cooking thing. Check out Chicken One's related blog, A Travel for Taste where she shares travel stories and recipes collected whenever she ventures abroad. And give Chicken Two's new, also-related blog, Poop from the Coop a read. There you can find stories about her personal adventure re-experiencing the kitchen after many years away. Please join our Facebook group to share your own recipes, kitchen practices and know-how. We are also on Pinterest and Instagram.
Complete recipes appear at the end of this post. 

From Chicken One:
Perhaps  you'd better read the other column first, for Chicken Two is giving you her take on the first time making egg nog from scratch. My column this time is a variation on that theme, and a completely different taste. 

I love egg nog in all its forms, including this one which tastes like a creamy, tropical cocktail, complete with coconut and rum. A recent trip to a tropical-themed restaurant taught me this drink is also known as coquito.

As you can see in this photo, the ingredients are common and you have to open a few cans. But it's all worth it.
First break apart cinnamon sticks and boil them in water for a great-smelling reduction. It certainly gives your house a holiday scent.
Whisk the reduction into some coconut milk. Then cook the egg yolks and evaporated milk over a double boiler until thickened. The common term for thickness in this case is, "until it coats the spoon".

I'll explain. You have to dip the spoon into the mixture, raise it and swipe through the back of it with your finger. When you start out, the thin mixure looks like this:
 
When thick, it will look like this:
 
If you go a little too long (like I did when I couldn't get the pan off the double boiler fast enough), it looks like this:
This last one is arguably a tad over the line for thickness. Cook it any longer and everything will become scrambled eggs. If you should happen to do this, and as long as it isn't TOO terribly scrambled-eggy, you can blend the finished product with a stick blender to smooth it out. This ONLY works in a small margin of cases, though, so keep an eye on that double boiler!

Now combine the cinnamon milk, thickened egg mixture and the rest into a wonderful concoction:
Add rum to taste. Don't hold the rum apart for combining individually at serve time like regular egg nog. The taste really depends on all the ingredients together. The recipe calls for 3 cups of rum, but the Chickens stopped at 2. We didn't want to overwhelm the creamy egg nog taste. All this is subjective, of course!

A word of warning: the coconut milk will partially solidify when chilled, so give the whole thing a shake or whisk before serving. Happy Holidays to you all!

Here's an impeck-able Chicken Two working egg-stra hard in the kitchen for you!
From Chicken Two:

To say my husband loves egg nog is an understatement! He impatiently awaits the arrival of the first container of egg nog at the grocery store and for the entire holiday season, there is at least a half gallon of it in the fridge. Lord help the store that runs out! Me, I can take it or leave it.  Until, that is, I experienced the pure taste of home made!

Even if you're not fond of it, give this a try…it could change your entire perspective. It did mine, for sure, and you're bound to have family members and friends who will love it, too!

My husband, the doctor, (yes, really) was somewhat skeptical of my making this and his first question was, "Are you cooking the eggs???" In a panic, I texted Chicken One. "Are we cooking the egg nog?" Thankfully, her reply was yes. (According to Alton Brown, you can do it both ways.)


Combine the first four ingredients over medium heat and cook to about 160 degrees, or until the spoon is coated. (See pic in column 1.)
Add the remainder of the ingredients.
Chill at least overnight - two days brings out the full flavor. 

This basic recipe is so simple, and, apart from grating our own nutmeg, doesn't take very long to do. I like the idea of being able to add bourbon or rum or what ever you want in the amounts you prefer, or nothing at all. To each his/her own!  

Don't tell Chicken One, but personally I prefer the
Puerto Rican version…it's got a little kick to it. My husband and family liked it, but we ran out of the basic egg nog first. I think that says something!

And not to be outdone (who's competitive???) here's a picture of Chicken One, stirring up a pot of trouble!

Have a safe and Happy Holiday!


Traditional Egg Nog

Ingredients
  • 10 eggs
  • 3/4 cup sugar
  • 4 cups milk
  • 3/4 teaspoon salt
  • 1 cup heavy cream
  • 1 teaspoon vanilla extract
  • 2 teaspoons freshly ground nutmeg
Cooking Directions
  1. Combine eggs, sugar, milk and salt in top of double boiler. Heat, stirring constantly, until mixture thickens enough to coat the spoon, which will be about 160 F.
  2. Remove from heat immediately. Stir in cream, vanilla and nutmeg.
  3. Chill til very cold. It's best to chill for two days for full flavor.
  4. Serve cold with brandy, whiskey or other spirits mixed in to taste. Garnish with more grated nutmeg.

Puerto Rican Egg Nog

Ingredients
  • 2 cups water
  • 8 whole cinnamon sticks
  • 6 egg yolks
  • 3 twelve-ounce cans evaporated milk
  • 2 twelve-ounce cans coconut milk
  • 3 fourteen-ounce cans sweetened condensed milk
  • 3 cups white rum
Cooking Directions
  1. Break up cinnamon sticks into pieces and combine with water in a small saucepan over high heat. Boil until reduced by half. Strain and set liquid aside. Let cool completely.
  2. Whisk together egg yolks and evaporated milk. Cook over double boiler until mixture coats spoon, about 160 F. Remove from heat immediately and allow to cool completely.
  3. Mix cinnamon liquid and coconut milk well. Stir in thickened egg mixture and sweetened, condensed milk. Add rum to taste.
  4. Chill overnight. Makes about 1 gallon.
Print Friendly and PDF

Wednesday, December 9, 2015

Mascarpone-Cardamom and Rosemary-Pine Nut Cookies

America's Test Chicken actually consists of two chickens, each with her own take on this cooking thing. Chicken One also publishes related blog, A Travel for Taste, where she shares travel stories and recipes collected whenever she ventures away from home. Not to be outdone, Chicken Two has an also-related blog, Poop from the Coop. There you can find reviews and her personal opinion on gadgets and equipment as she re-experiences the kitchen after many years away. So give these a read to round out the information found here.

Also, join our Facebook group to share your own recipes, kitchen practices and know-how. We are also on Pinterest and Instagram.

The complete recipes appear at the end of this post.

From Chicken One:
Mascarpone-Cardamom Cookies

Cookie day was a total SCAFU for me. It seems I went through Plan A, Plan B and Plan C before I was finally able to successfully make a darn thing. That darn thing was this delicious recipe for mascarpone-cardamom cookies. And it was worth the aggravation.

As it was, I had to make the dough on bake day but wait until the next day to roll it out and bake the cookies. This was because I'd thought I could grind whole cardamom seeds fine enough to use in this recipe. I was wrong.
First, I tried a mortar and pestle. Then I tried a food processor. Then I tried sifting the results through a strainer.
Lastly, I gave up, went to the supermarket on the way home, and bought ground cardamom. Then I got a good night's rest, rolled out the cookie spirals, and was handsomely rewarded with wonderfully crisp, tasty cookies. See the recipe at the bottom of this post for details.

The cardamom isn't part of the dough. It's mixed with sugar and used to roll the dough in.
 
At Chicken Two's suggestion, I also tried substituting ginger in place of the cardamom, which also worked. I have to say I like the cardamom better. If I had it to do over, I would use more ginger because the flavor was not strong enough. They tasted like plain sugar cookies. Good, but not ginger.

Rolling out the cookies was kinda fun. You sprinkle the counter with the sugar mixture and roll out the dough on top the sugar. Roll up half the dough. Then you turn it over and roll up the other half in the other direction.
When you cut the cookies off the roll, they are little double spirals:
I plan to put them in gift baskets along with my French sablés, macarons and a few pieces of chocolate. I'll give them as holiday gifts to the postal carrier, trash collector and others who efficiently render their services throughout the year.
From Chicken Two:
Rosemary-Pine Nut Cookies
When I first heard of these cookies, they didn't appeal to me much. In my mind, if it's a cookie, I want to taste sweetness in some form…sugar, chocolate, gummies….doesn't matter…I want sweet! I admit I'm still learning about savory things and the use of different herbs and spices. What a pleasant surprise! My daughter-in-law, Jessica, made them and gave me the recipe, which I will now share with you (recipe is below the photos).
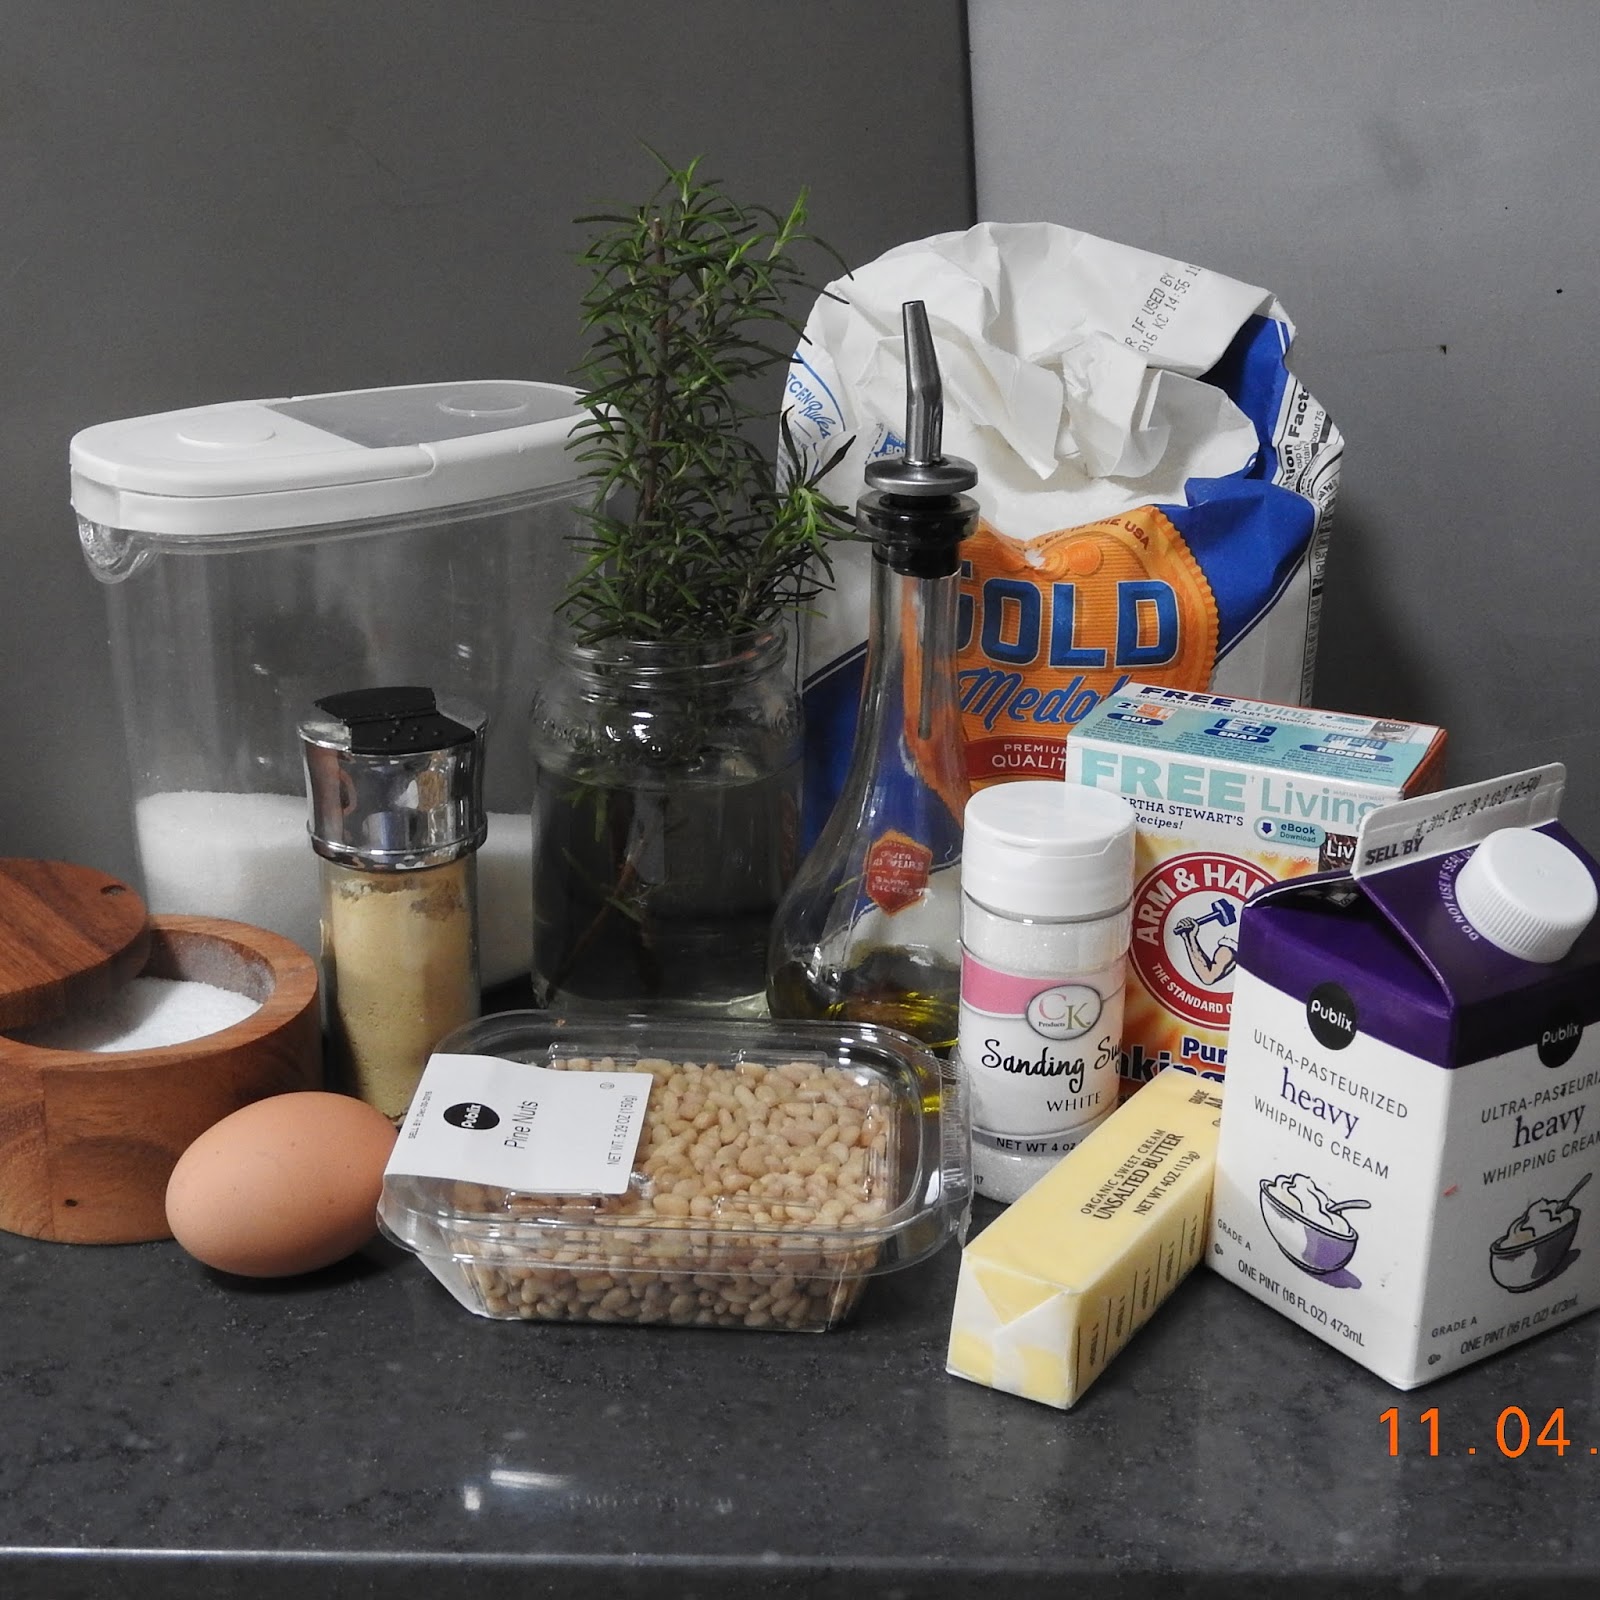
Assemble ingredients
Toast the pine nuts (it really brings out the flavor).
Butter and granulated sugar into the bowl of an electric mixer and, using a paddle, mix on high speed until pale and fluffy. Mix in oil, flour mixture and add cream, making sure each is mixed in thoroughly. Last, add egg and the rest of the flour.
Shape into 3/4-inch balls and space two inches apart on sheets lined with parchment paper.
Bake, rotating halfway through.
 
Yummy!
 

1. Mascarpone Cardamom Cookie Recipe
Ingredients
  • 1/2 cup mascarpone
  • 2 1/2 cups all-purpose flour
  • 1 cup butter, cut into small cubes
  • 3/4 cup granulated sugar
  • 1 teaspoon ground cardamom
Cooking Directions
  1. Add the mascarpone to a large bowl and blend until creamy. Pour in the flour and mix until crumbly. With the mixer still running, add the butter and continue mixing until the dough pulls away from the sides of bowl into a soft dough.
  2. Form the dough into a ball. Split into four equal pieces. Shape each piece into a rectangle. Wrap in parchment and refrigerate for at least 30 minutes to make the dough easier to roll.
  3. Once the cookie dough has chilled, preheat the oven to 375 F.
  4. In a small bowl, combine the granulated sugar and the cardamom and stir to mix.
  5. On a dry, smooth surface, sprinkle 3 tablespoons of the sugar mixture. Place on rectangle of dough on the surface, turning in the sugar to coat. Roll into a 12×5-inch rectangle. Turn the dough so that both sides are covered in sugar and cardamom.
  6. Tightly roll one of the short sides towards the center of the dough. Once you get to the center, turn the entire piece of dough over and roll the opposite end towards the center. Using a piece of floss or other string, cut 1⁄2" slices off the dough to create curled-S shapes.
  7. Carefully dredge each S-shaped cookie through some of the remaining cardamom sugar to coat. Place 2" apart on a parchment-lined baking sheet. Sprinkle with a bit of extra sugar. Repeat with the remaining dough.
  8. Bake for 15 minutes or until cookies are a light golden brown. Remove from the oven and allow them to cool slightly before transferring to a wire rack. Cool completely and store in an airtight container until ready to serve.

2. Rosemary Pine-Nut Cookie Recipe
Ingredients
  • 3 1/2 teaspoons coarsely chopped fresh rosemary
  • 1/4 cup pine nuts, toasted, plus more for topping cookies
  • 2 1/4 cups all-purpose flour
  • 1 teaspoon baking soda
  • 1/2 teaspoon ground ginger
  • 1/4 teaspoon coarse salt
  • 10 tablespoons (1 1/4 sticks) unsalted butter, softened
  • 1 cup + 2 tablespoons granulated sugar
  • 2 tablespoons extra-virgin olive oil
  • 3 tablespoons heavy cream
  • 1 large egg
  • fine sanding sugar for sprinkling
Cooking Directions
  1. Preheat oven to 325 degrees F. Finely chop rosemary in a food processor. Add pine nuts; pulse until coarsely ground. Transfer to a large bowl. Whisk in 2 cups flour, the baking soda, ginger, and salt; set aside.
  2. Put butter and granulated sugar into the bowl of an electric mixer fitted with the paddle attachment. Mix on high speed until pale and fluffy, about 5 minutes. Mix in oil. Reduce speed to low. Mix in flour mixture. Add cream; mix until well combined, about 2 minutes. Mix in egg, then remaining 1/4 cup flour.
  3. Shape dough into 3/4-inch balls, and space 2 inches apart on baking sheets lined with parchment paper. Flatten slightly with fingers, and top each with a pine nut. Sprinkle with sanding sugar.
  4. Bake cookies, rotating sheets halfway through, until edges are golden, about 13 minutes. Let cool 10 minutes on sheets on wire racks. Transfer cookies to racks to cool completely.
Print Friendly and PDF

Wednesday, November 25, 2015

Savory Carmelized Garlic, Spinach and Cheddar Tart

America's Test Chicken consists of two separate chickens, each with her own take on this cooking thing. Chicken One also has a related blog, A Travel for Taste where she shares travel stories and recipes collected whenever she ventures abroad. Not to be outdone, Chicken Two has a new, also-related blog, Poop from the Coop, which presents stories about her personal adventure re-experiencing the kitchen after many years away.

Please join our Facebook group to share your own recipes, kitchen practices and know-how. We are also on Pinterest and Instagram.

This time, we present a savory garlic and spinach tart that takes a bit of work, but the compliments you get will make it more than worthwhile!
The complete recipe appears at the end of this post.

From Chicken One:
This stunning dish was Chicken Two's idea. She'd found the recipe in a bon appétit magazine and raved about it after having made it twice. Of course I had to try it myself.

Because this dish appeared to be very much like quiche, I had to delve into the semantics of the whole situation. What I found was this:

Both a quiche and a tart
  • have a single, bottom crust
  • are baked in a straight-sided, possibly fluted dish whose bottom may be removable

A quiche
  • is always savory
  • always has an egg custard filling
A tart
A pie
  • can be sweet or savory, but in America it's usually sweet
  • is in a deeper dish than quiches or tarts
  • has the same kind of crust as quiches and tarts but also may have a top crust
  • is baked in a sloped-sided dish
That last point is valid, but if you only have a pie pan, use it for this recipe. It's what I did and it's equally good. Ok, I admit I used frozen pie shells from the supermarket, despite usually making them myself. But it was really fine in the end.

I'll let Chicken Two give you the particulars about how the whole thing's made, but here are some tips I figured out along the way.

First, you must bake the crust in advance. For that you need pie weights to keep the dough from becoming a giant bubble in the oven. You can use official pie weights, for sure, but I used rice. You can also use dry beans. Line the crust with foil or parchment first and don't try to cook the rice or beans for a meal afterward:

There is a whole lotta garlic in this tart. By the time it's cooked a couple of times with various enhancing ingredients, it's mild and delicious and totally palatable.

The downside is you have to peel three heads of it to start. Therefore, I recommend using this handy tool, a rubber garlic peeler that Chicken Two gave me. Check out her Poop from the Coop blog for a review of this useful kitchen gadget:
When you cook the garlic you must reduce the liquid to a syrupy consistency. You can tell it's at the right stage when it doesn't immediately rush to cover the pan's bottom when you scrape it away with a wooden spoon:
Cheddar is one of the main flavors in the tart. Therefore, spring for a mature, aged, white cheddar. I found mine at the Italian gourmet supermarket near here (read, mecca):
 
It will look as though there is too much spinach in the dish before you pour in the custard. But the liquid seeps down into the leaves and turns out to be just enough. Unless your dish is too shallow!
I wonder if there will ever be a way to give blog readers a taste of a recipe. If so, rush to this one first - it's really fantastic! It's creamy and moist with several compatible flavors prominent in the dish. It's also very pretty. Check out the marbling caused by the spinach in the dish:
You can serve it warm or chilled. It's a great brunch item that you can make in advance. If you use a disposable pie tin, it's very portable; you can take it to your next pot-luck.


From Chicken Two:
This recipe was a true surprise, unlike what I expected when I started out.
My daughter-in-law had a copy of bon appetit and, though it looked complicated, we decided to give it a shot. It was much easier than it looked!..
After peeling tons of garlic …three heads to be exact.
Boil until tender (about 3 min.)
Cook in heated oil until they turn brown, drain, then add vinegar and 1 cup water and bring to a      boil. Reduce heat and simmer until garlic is tender, 10–12 minutes. 
Add maple syrup, rosemary and thyme, and season with salt and pepper. Cook, stirring occasionally, until liquid is syrupy and coats garlic, about 5 minutes. 
Scatter cheese over crust...
 
Whisk together crème fraîche, cream, and remaining eggs in a medium bowl; season with salt and pepper. Pour over spinach. Add garlic and its syrup.
Bake for 35 minutes, until custard is set.
Enjoy!

SNAFU Alert: The second time I made this, I didn't have a 9-inch, deep-dish pie pan, so I tried a smaller, less deep pan. The custard spilled over into the oven and, without as much filling, the pie was almost solid garlic. Ok, it tasted great, but looked very odd and the custard is a big part of this recipe, so it was missed! The right pan is essential, in my humble opinion! 

Carmelized Garlic, Spinach and Cheddar Tart Recipe
Ingredients
  • 1 tart/pie crust
  • 5 large eggs
  • 3 heads of garlic, cloves peeled
  • kosher salt, to taste
  • 1 tablespoon olive oil
  • 1 tablespoon balsamic vinegar
  • 1 tablespoon maple syrup
  • 1 teaspoon chopped fresh rosemary
  • 1 teaspoon chopped fresh thyme
  • freshly ground black pepper, to taste
  • 6 ounces (about 2 cups) sharp white cheddar, grated
  • 2 cups baby spinach
  • 3/4 cup crème fraîche
  • 3/4 cup heavy cream 
Directions:
  1. Place a rack in lower third of oven; preheat to 350°. 
  2. Line dough with parchment paper or foil, leaving some overhang. Fill with pie weights or dried beans or rice. Bake until crust is dry around edge, 25–30 minutes. 
  3. Beat 1 egg in a small bowl. Remove parchment and weights and brush entire crust with egg. Bake until crust is dry and set, 10–15 minutes. Let cool. 
  4. Meanwhile, cook garlic in a medium saucepan of boiling salted water until beginning to soften, about 3 minutes; drain. 
  5. Wipe saucepan dry and heat oil in pan over medium-high heat. Add garlic and cook, stirring occasionally, until cloves start to turn golden brown, about 2 minutes. Add vinegar and 1 cup water and bring to a boil. Reduce heat and simmer until garlic is tender, 10–12 minutes. Add maple syrup, rosemary, and thyme, and season with salt and pepper. Cook, stirring occasionally, until liquid is syrupy and coats garlic, about 5 minutes. 
  6. Scatter cheese over crust; top with spinach. 
  7. Whisk together crème fraîche, cream, and remaining eggs in a medium bowl; season with salt and pepper. Pour over spinach. Add garlic and its syrup. 
  8. Bake until custard is set and golden brown in spots, 35–40 minutes. Let cool on a wire rack. 
  9. Serve warm or cold.

Print Friendly and PDF